
This is an old revision of the document!
Table of Contents
Mission Overview
To successfully launch and recovery a high altitude balloon which will start near sea level, rise to 31,000m, and safely return to the surface all while transmitting the location of the payload. Ground teams must be prepared and trained to handle all radio communication from other teams and radio downlink from the payload.
Target Burst Altitude: 31,000m
Current Estimated Ascent Rate: 5.83 m/s
Current Estimate Decent Rate: 6.37 m/s
Current Payload Mass Estimate: 4 pounds or 1.81kg
Required Helium: 4.65m3 or 164 cu-ft or 4646L
Launch Time/Date: Current Launch date is set to Saturday March 30th, 2013 at 10:00am
Launch Location:\
Decimal:(34.109233,-115.682822)
Deg-Min-Sec:+34° 6' 33.34“, -115° 40' 58.83”
Altitude 395m
Launch/Landing Estimated Time Duration: 2 Hours 00 Minutes
The following is a simulation launch from Twentynine Palms on December 24th, 2012 at 10:00am. We can see the full flight path.  Orange zones are difficult recovery zones. Red zones are water and will likely result in no recovery.
Orange zones are difficult recovery zones. Red zones are water and will likely result in no recovery. Green boxes are military airspace.. we don't want to go there. 
System Overview

Rules and Regulations
RULES:
[[http://www.chem.hawaii.edu/uham/part101.html|http://www.chem.hawaii.edu/uham/part101.html}}
[[http://ecfr.gpoaccess.gov/cgi/t/text/text-idx?c=ecfr&rgn=div5&view=text&node=14:2.0.1.3.15&idno=14|http://ecfr.gpoaccess.gov/cgi/t/text/text-idx?c=ecfr&rgn=div5&view=text&node=14:2.0.1.3.15&idno=14}}
STEP 1: Email FAA requesting launch
STEP 2: Request/Obtain NOTAM
STEP 3: Obtain phone number for LA Center ARTCC (done)
STEP 4: Make phone calls to air control before and after launch
Flight Hardware
HABEX2 Initial CAD pictures available here: [[http://www.flickr.com/photos/arkorobotics/sets/72157632317793340/|http://www.flickr.com/photos/arkorobotics/sets/72157632317793340/}} HABEX2 CAD Files: [[svn:svn.032.la:6699/032/HABEX2_CAD|svn:svn.032.la:6699/032/HABEX2_CAD}} 

Balloon
Balloon Hardware
BALLOON PART NO: HAB-1200 (1200 gram) - [[http://kaymontballoons.com/Near_Space_Photography.html|http://kaymontballoons.com/Near_Space_Photography.html}}

Ascent Rate Calculations
USE THE FOLLOWING CALCULATOR: [[http://www.cusf.co.uk/calc/|http://www.cusf.co.uk/calc/}}
{| width=“800” border=“1” cellpadding=“1” cellspacing=“1”
Current Estimated Ascent Rate: \ 5.83 m/s
Helium Specs
Required Helium: \ \ \ 4.65m3 \ or \ 164 cu-ft \ or \ 4646L
Burst Altitude
Current Estimated Burst Altitude: \ 31,000m
Parachute
Parachute Hardware
48“ Parachute: [[http://www.rocketchutes.com/|http://www.rocketchutes.com/}} [[http://spherachutes.com/items/spherachutes/list.htm|http://spherachutes.com/items/spherachutes/list.htm}}
Tabs Grommets -\ [[http://www.amazon.com/Lord-Hodge-1073A-0-Grommet-Kits/dp/B00004Y68Y/|http://www.amazon.com/Lord-Hodge-1073A-0-Grommet-Kits/dp/B00004Y68Y/}}
Decent Rate Calculations
Decent Velocity Calculations: [[http://my.execpc.com/~culp/rockets/descent.html|http://my.execpc.com/~culp/rockets/descent.html}}

{| width=“600” border=“1” cellpadding=“1” cellspacing=“1”
Current Estimate Decent Rate: 6.37 m/s
Parachute Testing
Parachute Test's:
- From 35ft drop to test parachute deploy system. Two different arrangements will be tested.
1) Drop test with Balloon tied to parachute, parachute tied to payload.

2) Drop test with balloon tied to the payload and the parachute tied 1/3 the way down from the ballon

Camera Tests:
<html> <iframe width=“560” height=“315” src=“http://www.youtube.com/embed/ArX5biQGRgo” frameborder=“0” allowfullscreen></iframe> \ \ <iframe width=“560” height=“315” src=“http://www.youtube.com/embed/vi2OocU6kEY” frameborder=“0” allowfullscreen></iframe> </html>
Payload
Payload Overview

Payload Mass
{| width=“600” border=“1” cellpadding=“1” cellspacing=“1”
- *Current Total Payload Mass: \ 4 pounds \ or \ 1.81kg === Payload Hardware Layout === —-

 3D model of the HABEX payload: <html>
<iframe frameborder=“0” height=“480” width=“854” allowFullScreen webkitallowfullscreen=“true” mozallowfullscreen=“true” src=“http://skfb.ly/lki2dcb?autostart=0&transparent=0&autospin=0&controls=1&watermark=1”></iframe>
</html> [[http://www.lanepackaging.com/store/corrugated-cartons/products/moulded-polystyrene-cold-boxes|Polystyrene Cold Box XPL11}}
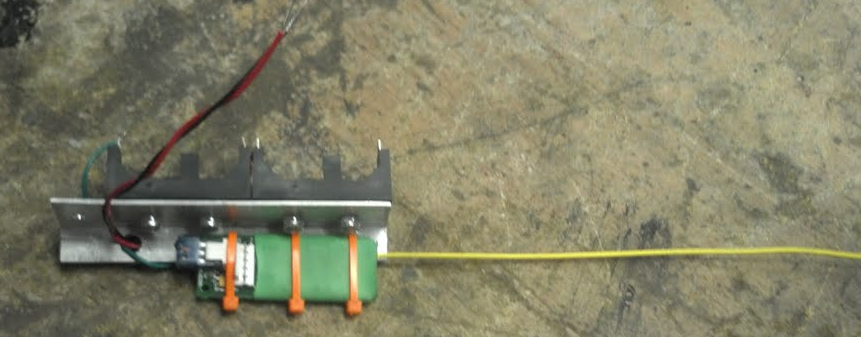
=== Tracking Radio Alpha ===
—-
HABEX Primary Radio - Radio Alpha - Micro-Trak RTG FA
—-
The primary radio for HABEX2 is a Micro-Trak RTG FA. The radio has an input for power and a GPS module, the output is an APRS packet with the GPS coordinates/altitude on 144.390Mhz (1W-10W). \
More Information:
Micro-Track RTF FA: (\ [[http://www.byonics.com/mt-rtg|www.byonics.com/mt-rtg}}\ )
APRS: (\ [[http://en.wikipedia.org/wiki/Automatic_Packet_Reporting_System|en.wikipedia.org/wiki/Automatic_Packet_Reporting_System}}\ )
3D model of the HABEX payload: <html>
<iframe frameborder=“0” height=“480” width=“854” allowFullScreen webkitallowfullscreen=“true” mozallowfullscreen=“true” src=“http://skfb.ly/lki2dcb?autostart=0&transparent=0&autospin=0&controls=1&watermark=1”></iframe>
</html> [[http://www.lanepackaging.com/store/corrugated-cartons/products/moulded-polystyrene-cold-boxes|Polystyrene Cold Box XPL11}}
=== Tracking Radio Alpha ===
—-
HABEX Primary Radio - Radio Alpha - Micro-Trak RTG FA
—-
The primary radio for HABEX2 is a Micro-Trak RTG FA. The radio has an input for power and a GPS module, the output is an APRS packet with the GPS coordinates/altitude on 144.390Mhz (1W-10W). \
More Information:
Micro-Track RTF FA: (\ [[http://www.byonics.com/mt-rtg|www.byonics.com/mt-rtg}}\ )
APRS: (\ [[http://en.wikipedia.org/wiki/Automatic_Packet_Reporting_System|en.wikipedia.org/wiki/Automatic_Packet_Reporting_System}}\ )


 == Alpha Radio Status ==
—-
{| border=“1”
|-
| bgcolor=“white” |
Parts
| bgcolor=“white” |
Details
| bgcolor=“white” |
Status
| bgcolor=“white” |
Next Task
|-
| bgcolor=“white” | Radio:\
| bgcolor=“white” | Byonics Micro-Trak RTG FA High Altitude Combo\ [[http://www.byonics.com/mt-rtg|www.byonics.com/mt-rtg}}\ \
| bgcolor=“00CCFF” | Basic Testing
| bgcolor=“white” | Spec Testing \ \ \ \ \
|-
| bgcolor=“white” | Antenna:
| bgcolor=“white” | V6 Dipole / V3 Whip (Testing required to pick final antenna)\ [[http://www.byonics.com/microtrak/mt_antenna.php|www.byonics.com/microtrak/mt_antenna.php}}\ \ \ \
| bgcolor=“00CCFF” | Basic Testing
| bgcolor=“white” | Spec Testing
|-
| bgcolor=“white” | GPS:
| bgcolor=“white” | Byonics GPS4 ( High Altitude, capable of 224,000ft) \ [[http://www.byonics.com/gps|www.byonics.com/gps}}
| bgcolor=“00CCFF” | Basic Testing
| bgcolor=“white” | Spec Testing
|-
| bgcolor=“white” | Battery:
| bgcolor=“white” | [[http://www.energizer.com/batteries/performance-lithium/advanced-lithium/Pages/aa.aspx|http://www.energizer.com/batteries/performance-lithium/advanced-lithium/Pages/aa.aspx}}
| bgcolor=“00CCFF” | Not Purchased \ \ \
| bgcolor=“white” | Basic Testing
|-
| bgcolor=“white” | Battery Holders:\
| bgcolor=“white” | [[http://www.batteryspace.com/batteryholder4xaabatteryholderwith626awgwireleads-rohscompliant.aspx|http://www.batteryspace.com/batteryholder4xaabatteryholderwith626awgwireleads-rohscompliant.aspx}}
| bgcolor=“00CCFF” | Not Purchased
| bgcolor=“white” | Basic Testing
|-
| bgcolor=“white” | Power Regulators:\
| bgcolor=“white” | Batteries supply correct voltage to electronics
| bgcolor=“white” | Not Required\t
| bgcolor=“white” | Not Required
|}
The hardware will be purchased and tested. After a design analysis we will determine if a redesign is necessary for the given environment. We will take into consideration thermal and pressure properties.
Prototype hardware has been purchased for basic testing. FA High Altitude hardware will be purchased this week.
== Alpha Radio Specs ==
—-
HABEX Radio Alpha - Micro Trak RTG FA - Circuit Analysis: habex_radio_alpha_circuit_analysis.pdf
{| border=“1”
|-
| bgcolor=“white” |
Parts
| bgcolor=“white” |
Mass
| bgcolor=“white” |
Size
| bgcolor=“white” |
Power
|-
| bgcolor=“white” | Radio:\
| bgcolor=“white” | 300g or 0.6614lbs
| bgcolor=“white” | 8” x 4“ x 2”
| bgcolor=“white” | 0.05A continuous (with LED) and 0.17A transmitting (with LED)
|-
| bgcolor=“white” | Antenna:
| bgcolor=“white” | Apart of radio mass
| bgcolor=“white” | Apart of radio size
| bgcolor=“white” | Apart of radio power
|-
| bgcolor=“white” | GPS:
| bgcolor=“white” | Apart of radio mass
| bgcolor=“white” | Apart of radio size
| bgcolor=“white” | Apart of radio power
|-
| bgcolor=“white” | Battery:
| bgcolor=“white” | 14.5g per battery, 8 batteries totals to 116g or 0.2557lbs
| bgcolor=“white” | Apart of the Battery Holder size
| bgcolor=“white” | 3000mAh at AA Battery(1.5v to 0.9v) with 8 AA Voltage Range (12V to 7.2V)
|-
| bgcolor=“white” | Battery Holders:\
| bgcolor=“white” | 1 case is 5.7g, 2 cases 11.4g or 0.025lbs
| bgcolor=“white” | 2.48“ x 2.24” x 0.63“ per holder, totals to 2.48” x 2.24“ x 1.26”
| bgcolor=“white” |
|-
| bgcolor=“white” | TOTAL:\
| bgcolor=“white” | 427.4g or 0.95lbs
| bgcolor=“white” | 8“ x 4” x 2“
| bgcolor=“white” | Battery voltage starts at 12.0V and drops to 7.2V, 25 hours of operation
|}
Specs:
Micro Trak RTG FA:
* Operating Input Voltage Range: 8v ≤ Vin ≤ 15.0v
* Expected Output Voltage Range: 4.8v ≤ Vlogic ≤5.2v
* Operating Temperature Range: -30C to +80C
* RF Power Range: 1.75W - 2.25W (Target: 2W)
* Operating Pressure: Unknown
* Operating Current: 0.05A - 0.17A
Battery (8 AA Lithium):
* Expected Output Voltage Range: 6.4v ≤ Vbattery ≤ 12.0v
* Expected Current: 0.05A - 0.17A
* Current Rating: 0.00A - 3.0A (5.0A pulse)
* Operating Temperature Range: -40C to +60C
* Operating Pressure: Unknown
* Expected Duration of Operation: \ 70 Hours\ (Calculated based on 3000mAh rating and Energizer L91 datasheet drain plots)
* Battery Analysis: [[http://www.batteryshowdown.com/results-lo.html|http://www.batteryshowdown.com/results-lo.html}}
Physical:
* Dimensions: 8” x 4“ x 2”
* Mass: 1lb
== Alpha Radio Datasheets and Documentation ==
—-
Derating & Temperature Spreadsheet: radio_alpha_parts.xlsx PIC16F1826 Datasheet: 41391d.pdf Lithium AA Battery Datasheet: l91.pdf \ LM7805 Datasheet: lm7805.pdf \ MCD2006G (RF Transmitter) Datasheet: mcd2006g.pdf \ RA08H1317M (RF Power Amplifier) Datasheet: ra08h1317m.pdf \
HABEX Radio Alpha - Micro Trak RTG FA - Circuit Analysis: habex_radio_alpha_circuit_analysis.pdf
Battery Analysis: [[http://www.batteryshowdown.com/results-lo.html|http://www.batteryshowdown.com/results-lo.html}}
=== Tracking Radio Bravo ===
—-
HABEX Secondary Radio - Radio Bravo - NSL Tracker
—-
Inexpensive GSM/GPS backup tracker for our HABEX2 project.\ There are a couple out on the market. Things for tracking your pets and such.\ But instead of buying one, we wanted to make one that's easily hackable and could be configured specifically for the HABEX mission.\ At the core of the tracker is simcom's SIM908 module.
Wikipage for the tracker:[[NSL Tracker}}
== Alpha Radio Status ==
—-
{| border=“1”
|-
| bgcolor=“white” |
Parts
| bgcolor=“white” |
Details
| bgcolor=“white” |
Status
| bgcolor=“white” |
Next Task
|-
| bgcolor=“white” | Radio:\
| bgcolor=“white” | Byonics Micro-Trak RTG FA High Altitude Combo\ [[http://www.byonics.com/mt-rtg|www.byonics.com/mt-rtg}}\ \
| bgcolor=“00CCFF” | Basic Testing
| bgcolor=“white” | Spec Testing \ \ \ \ \
|-
| bgcolor=“white” | Antenna:
| bgcolor=“white” | V6 Dipole / V3 Whip (Testing required to pick final antenna)\ [[http://www.byonics.com/microtrak/mt_antenna.php|www.byonics.com/microtrak/mt_antenna.php}}\ \ \ \
| bgcolor=“00CCFF” | Basic Testing
| bgcolor=“white” | Spec Testing
|-
| bgcolor=“white” | GPS:
| bgcolor=“white” | Byonics GPS4 ( High Altitude, capable of 224,000ft) \ [[http://www.byonics.com/gps|www.byonics.com/gps}}
| bgcolor=“00CCFF” | Basic Testing
| bgcolor=“white” | Spec Testing
|-
| bgcolor=“white” | Battery:
| bgcolor=“white” | [[http://www.energizer.com/batteries/performance-lithium/advanced-lithium/Pages/aa.aspx|http://www.energizer.com/batteries/performance-lithium/advanced-lithium/Pages/aa.aspx}}
| bgcolor=“00CCFF” | Not Purchased \ \ \
| bgcolor=“white” | Basic Testing
|-
| bgcolor=“white” | Battery Holders:\
| bgcolor=“white” | [[http://www.batteryspace.com/batteryholder4xaabatteryholderwith626awgwireleads-rohscompliant.aspx|http://www.batteryspace.com/batteryholder4xaabatteryholderwith626awgwireleads-rohscompliant.aspx}}
| bgcolor=“00CCFF” | Not Purchased
| bgcolor=“white” | Basic Testing
|-
| bgcolor=“white” | Power Regulators:\
| bgcolor=“white” | Batteries supply correct voltage to electronics
| bgcolor=“white” | Not Required\t
| bgcolor=“white” | Not Required
|}
The hardware will be purchased and tested. After a design analysis we will determine if a redesign is necessary for the given environment. We will take into consideration thermal and pressure properties.
Prototype hardware has been purchased for basic testing. FA High Altitude hardware will be purchased this week.
== Alpha Radio Specs ==
—-
HABEX Radio Alpha - Micro Trak RTG FA - Circuit Analysis: habex_radio_alpha_circuit_analysis.pdf
{| border=“1”
|-
| bgcolor=“white” |
Parts
| bgcolor=“white” |
Mass
| bgcolor=“white” |
Size
| bgcolor=“white” |
Power
|-
| bgcolor=“white” | Radio:\
| bgcolor=“white” | 300g or 0.6614lbs
| bgcolor=“white” | 8” x 4“ x 2”
| bgcolor=“white” | 0.05A continuous (with LED) and 0.17A transmitting (with LED)
|-
| bgcolor=“white” | Antenna:
| bgcolor=“white” | Apart of radio mass
| bgcolor=“white” | Apart of radio size
| bgcolor=“white” | Apart of radio power
|-
| bgcolor=“white” | GPS:
| bgcolor=“white” | Apart of radio mass
| bgcolor=“white” | Apart of radio size
| bgcolor=“white” | Apart of radio power
|-
| bgcolor=“white” | Battery:
| bgcolor=“white” | 14.5g per battery, 8 batteries totals to 116g or 0.2557lbs
| bgcolor=“white” | Apart of the Battery Holder size
| bgcolor=“white” | 3000mAh at AA Battery(1.5v to 0.9v) with 8 AA Voltage Range (12V to 7.2V)
|-
| bgcolor=“white” | Battery Holders:\
| bgcolor=“white” | 1 case is 5.7g, 2 cases 11.4g or 0.025lbs
| bgcolor=“white” | 2.48“ x 2.24” x 0.63“ per holder, totals to 2.48” x 2.24“ x 1.26”
| bgcolor=“white” |
|-
| bgcolor=“white” | TOTAL:\
| bgcolor=“white” | 427.4g or 0.95lbs
| bgcolor=“white” | 8“ x 4” x 2“
| bgcolor=“white” | Battery voltage starts at 12.0V and drops to 7.2V, 25 hours of operation
|}
Specs:
Micro Trak RTG FA:
* Operating Input Voltage Range: 8v ≤ Vin ≤ 15.0v
* Expected Output Voltage Range: 4.8v ≤ Vlogic ≤5.2v
* Operating Temperature Range: -30C to +80C
* RF Power Range: 1.75W - 2.25W (Target: 2W)
* Operating Pressure: Unknown
* Operating Current: 0.05A - 0.17A
Battery (8 AA Lithium):
* Expected Output Voltage Range: 6.4v ≤ Vbattery ≤ 12.0v
* Expected Current: 0.05A - 0.17A
* Current Rating: 0.00A - 3.0A (5.0A pulse)
* Operating Temperature Range: -40C to +60C
* Operating Pressure: Unknown
* Expected Duration of Operation: \ 70 Hours\ (Calculated based on 3000mAh rating and Energizer L91 datasheet drain plots)
* Battery Analysis: [[http://www.batteryshowdown.com/results-lo.html|http://www.batteryshowdown.com/results-lo.html}}
Physical:
* Dimensions: 8” x 4“ x 2”
* Mass: 1lb
== Alpha Radio Datasheets and Documentation ==
—-
Derating & Temperature Spreadsheet: radio_alpha_parts.xlsx PIC16F1826 Datasheet: 41391d.pdf Lithium AA Battery Datasheet: l91.pdf \ LM7805 Datasheet: lm7805.pdf \ MCD2006G (RF Transmitter) Datasheet: mcd2006g.pdf \ RA08H1317M (RF Power Amplifier) Datasheet: ra08h1317m.pdf \
HABEX Radio Alpha - Micro Trak RTG FA - Circuit Analysis: habex_radio_alpha_circuit_analysis.pdf
Battery Analysis: [[http://www.batteryshowdown.com/results-lo.html|http://www.batteryshowdown.com/results-lo.html}}
=== Tracking Radio Bravo ===
—-
HABEX Secondary Radio - Radio Bravo - NSL Tracker
—-
Inexpensive GSM/GPS backup tracker for our HABEX2 project.\ There are a couple out on the market. Things for tracking your pets and such.\ But instead of buying one, we wanted to make one that's easily hackable and could be configured specifically for the HABEX mission.\ At the core of the tracker is simcom's SIM908 module.
Wikipage for the tracker:[[NSL Tracker}}

 T-Mobile Coverage:
  AT&T Coverage: \ \
  == Bravo Radio Status ==
—-
{| border=“1”
|-
| bgcolor=“white” |
Parts
| bgcolor=“white” |
Details
| bgcolor=“white” |
Status
| bgcolor=“white” |
Next Task
|-
| bgcolor=“white” | Radio:\
| bgcolor=“white” | [[NSL Tracker}}\ \ \ \ \ \ \ \ \ \ \ \ \ \ \ \ \ \ \ \ \ \ \ \ \ \
| bgcolor=“00CCFF” | Assembled
| bgcolor=“white” | Firmware Testing
|-
| bgcolor=“white” | Battery:
| bgcolor=“white” | [[http://www.batteryspace.com/Polymer-Li-Ion-battery-3.7V-2000mAh-7.4-Wh-with-10K-NTC.aspx|2000mah w/ 10K temp probe}}
| bgcolor=“00CCFF” | Purchased
| bgcolor=“white” | Basic Testing
|-
| bgcolor=“white” | Battery Holders:\
| bgcolor=“white” |
| bgcolor=“00CCFF” | Not Purchased
| bgcolor=“white” | Basic Testing
|-
| bgcolor=“white” | GPS Antenna:\
| bgcolor=“white” |
| bgcolor=“00CCFF” | Purchased
| bgcolor=“white” | Basic Testing
|-
| bgcolor=“white” | Cell Phone Antenna:\
| bgcolor=“white” |
| bgcolor=“00CCFF” | Purchased
| bgcolor=“white” | Basic Testing
|}
== Bravo Radio Specs ==
—-
== Bravo Radio Datasheets and Documentation ==
—-
=== Tracking Radio Charlie ===
== Bravo Radio Status ==
—-
{| border=“1”
|-
| bgcolor=“white” |
Parts
| bgcolor=“white” |
Details
| bgcolor=“white” |
Status
| bgcolor=“white” |
Next Task
|-
| bgcolor=“white” | Radio:\
| bgcolor=“white” | [[NSL Tracker}}\ \ \ \ \ \ \ \ \ \ \ \ \ \ \ \ \ \ \ \ \ \ \ \ \ \
| bgcolor=“00CCFF” | Assembled
| bgcolor=“white” | Firmware Testing
|-
| bgcolor=“white” | Battery:
| bgcolor=“white” | [[http://www.batteryspace.com/Polymer-Li-Ion-battery-3.7V-2000mAh-7.4-Wh-with-10K-NTC.aspx|2000mah w/ 10K temp probe}}
| bgcolor=“00CCFF” | Purchased
| bgcolor=“white” | Basic Testing
|-
| bgcolor=“white” | Battery Holders:\
| bgcolor=“white” |
| bgcolor=“00CCFF” | Not Purchased
| bgcolor=“white” | Basic Testing
|-
| bgcolor=“white” | GPS Antenna:\
| bgcolor=“white” |
| bgcolor=“00CCFF” | Purchased
| bgcolor=“white” | Basic Testing
|-
| bgcolor=“white” | Cell Phone Antenna:\
| bgcolor=“white” |
| bgcolor=“00CCFF” | Purchased
| bgcolor=“white” | Basic Testing
|}
== Bravo Radio Specs ==
—-
== Bravo Radio Datasheets and Documentation ==
—-
=== Tracking Radio Charlie ===
 —-
HABEX Backup Radio - Radio Charlie - RF Beacon
—-
== Charlie Radio Status ==
—-
{| border=“1”
|-
| bgcolor=“white” | \
Parts\
| bgcolor=“white” | \
Details\
| bgcolor=“white” | \
Status\
| bgcolor=“white” | \
Next Task\
|-
| bgcolor=“white” | Radio:\ \ \ \ \ \ \ \ \ \ \ \ \ \ \ \ \ \ \
| bgcolor=“white” | Big Red Bee HP\ \ \ \ \ \ \ \ \ \ \ \t\ \ \ \ \ \ \ \ \ \ \ \ \ \ \ \ \ \ \ \ \ \ \ \ \ \
| bgcolor=“00CCFF” | Purchased\
| bgcolor=“white” | Additional testing
|-
| bgcolor=“white” | Battery:\
| bgcolor=“white” | 2xCR-123A cells\
| bgcolor=“00CCFF” | Purchased
| bgcolor=“white” | None
|-
| bgcolor=“white” | Battery Holders:\ \
| bgcolor=“white” | CR-123A holders (Mouser)\
| bgcolor=“00CCFF” | Purchased
| bgcolor=“white” | None
|-
| bgcolor=“white” | Antenna:\ \
| bgcolor=“white” | Simple wire dipole; Yagis for tracking\
| bgcolor=“00CCFF” | Purchased\
| bgcolor=“white” | None
|}
== Charlie Radio Specs ==
—-
The Charlie beacon is a simple UHF transmitter that broadcasts an intermittent FM tone with morse identification. This beacon is tracked using a directional Yagi antenna, compass and GPS from at least 2 ground stations. Beacon hits are plotted on a map and [[http://en.wikipedia.org/wiki/Radio_triangulation|triangulation}} is used to locate the package.
* Recommended tracking antenna:[[http://www.nr6ca.org/70cmyagi.html|Simple 70cm Yagi}}
== Charlie Radio Datasheets and Documentation ==
Specs:
* Frequency range user programmable in 250Hz steps from 420-450 Mhz
* Built-in 1/4 wavelength whip antenna
* Output power user selectable from -8 to +24 dBm
* Size less than 2x5cm, 6gm (board only)
* PC programmable call sign, frequency, and tone parameters (requires optional serial port adapter)
* On board voltage regulator for 4-12 volt input (see documentation for restrictions)
* Low voltage battery protection
* Range: Tested on the ground to over 5 miles, and over 180 *miles* in the air!
Links:
* [[http://www.bigredbee.com/BeeLine.htm|Big Red Bee Transmitter FAQ}}
* [[http://www.bigredbee.com/docs/beeline/BeeLineDoc.pdf|Documentation}}
* [[http://www.bigredbee.com/docs/beeline/beeline.135.zip|Configuration software}}
—-
=== Science Payload ===
—-
HABEX Science Payload
—-
—-
HABEX Backup Radio - Radio Charlie - RF Beacon
—-
== Charlie Radio Status ==
—-
{| border=“1”
|-
| bgcolor=“white” | \
Parts\
| bgcolor=“white” | \
Details\
| bgcolor=“white” | \
Status\
| bgcolor=“white” | \
Next Task\
|-
| bgcolor=“white” | Radio:\ \ \ \ \ \ \ \ \ \ \ \ \ \ \ \ \ \ \
| bgcolor=“white” | Big Red Bee HP\ \ \ \ \ \ \ \ \ \ \ \t\ \ \ \ \ \ \ \ \ \ \ \ \ \ \ \ \ \ \ \ \ \ \ \ \ \
| bgcolor=“00CCFF” | Purchased\
| bgcolor=“white” | Additional testing
|-
| bgcolor=“white” | Battery:\
| bgcolor=“white” | 2xCR-123A cells\
| bgcolor=“00CCFF” | Purchased
| bgcolor=“white” | None
|-
| bgcolor=“white” | Battery Holders:\ \
| bgcolor=“white” | CR-123A holders (Mouser)\
| bgcolor=“00CCFF” | Purchased
| bgcolor=“white” | None
|-
| bgcolor=“white” | Antenna:\ \
| bgcolor=“white” | Simple wire dipole; Yagis for tracking\
| bgcolor=“00CCFF” | Purchased\
| bgcolor=“white” | None
|}
== Charlie Radio Specs ==
—-
The Charlie beacon is a simple UHF transmitter that broadcasts an intermittent FM tone with morse identification. This beacon is tracked using a directional Yagi antenna, compass and GPS from at least 2 ground stations. Beacon hits are plotted on a map and [[http://en.wikipedia.org/wiki/Radio_triangulation|triangulation}} is used to locate the package.
* Recommended tracking antenna:[[http://www.nr6ca.org/70cmyagi.html|Simple 70cm Yagi}}
== Charlie Radio Datasheets and Documentation ==
Specs:
* Frequency range user programmable in 250Hz steps from 420-450 Mhz
* Built-in 1/4 wavelength whip antenna
* Output power user selectable from -8 to +24 dBm
* Size less than 2x5cm, 6gm (board only)
* PC programmable call sign, frequency, and tone parameters (requires optional serial port adapter)
* On board voltage regulator for 4-12 volt input (see documentation for restrictions)
* Low voltage battery protection
* Range: Tested on the ground to over 5 miles, and over 180 *miles* in the air!
Links:
* [[http://www.bigredbee.com/BeeLine.htm|Big Red Bee Transmitter FAQ}}
* [[http://www.bigredbee.com/docs/beeline/BeeLineDoc.pdf|Documentation}}
* [[http://www.bigredbee.com/docs/beeline/beeline.135.zip|Configuration software}}
—-
=== Science Payload ===
—-
HABEX Science Payload
—-
 Current list of sensors in the science payload, tentatively named “Null Space Labs”
== Science Payload Status ==
—-
{| border=“1”
|-
| bgcolor=“white” | \
Parts\
| bgcolor=“white” | \
Details\
| bgcolor=“white” | \
Status\
| bgcolor=“white” | \
Next Task\
|-
| bgcolor=“white” | Accelerometer / Gyroscope:\ \ \ \ \ \ \ \ \ \ \ \ \ \ \ \ \ \ \
| bgcolor=“white” |
\ Invensense 9150 -
* 3-axis gyroscope
* 3-axis accelerometer
* 3-axis compass\
* \ [[http://invensense.com/mems/gyro/mpu9150.html|invensense.com/mems/gyro/mpu9150.html}} \ \ \ \ \ \ \ \ \t\ \ \ \ \ \ \ \ \ \ \ \ \ \ \ \ \ \ \ \ \ \ \ \ \ \
| bgcolor=“00CCFF” | Prototype
| bgcolor=“white” | Basic Testing
|-
| bgcolor=“white” | Barometer:\
| bgcolor=“white” |
* Measurement Specialties MS5540-CM
* [[http://media.digikey.com/pdf/Data%20Sheets/Measurement%20Specialties%20PDFs/MS5540-CM.pdf|media.digikey.com/pdf/Data%20Sheets/Measurement%20Specialties%20PDFs/MS5540-CM.pdf}}
| bgcolor=“00CCFF” | Prototyped
| bgcolor=“white” | Basic Testing
|-
| bgcolor=“white” | SD Card:\t
| bgcolor=“white” |
| bgcolor=“00CCFF” | Prototyped\t
| bgcolor=“white” | Basic Testing
|-
| bgcolor=“white” | Bluetooth:\t
| bgcolor=“white” |
| bgcolor=“00CCFF” | Prototyped\t
| bgcolor=“white” | Basic Testing
|-
| bgcolor=“white” | Battery:\ \
| bgcolor=“white” | \
| bgcolor=“00CCFF” | Not Purchased
| bgcolor=“white” | Purchase
|-
| bgcolor=“white” | Battery Holder:\ \
| bgcolor=“white” | \
| bgcolor=“00CCFF” | Not Purchased\
| bgcolor=“white” | Purchase
|}
== Science Payload Specs ==
—-
== Science Payload Datasheets and Documentation ==
—-
Eagle files live here:
spacelab1.zip
=== Camera ===
—-
HABEX Camera
—-
Current list of cameras in the science payload. Tenative plan is a Canon SD450 running CHDK for still photography and a HackHD camera for taking HD video of ascent/descent
Current list of sensors in the science payload, tentatively named “Null Space Labs”
== Science Payload Status ==
—-
{| border=“1”
|-
| bgcolor=“white” | \
Parts\
| bgcolor=“white” | \
Details\
| bgcolor=“white” | \
Status\
| bgcolor=“white” | \
Next Task\
|-
| bgcolor=“white” | Accelerometer / Gyroscope:\ \ \ \ \ \ \ \ \ \ \ \ \ \ \ \ \ \ \
| bgcolor=“white” |
\ Invensense 9150 -
* 3-axis gyroscope
* 3-axis accelerometer
* 3-axis compass\
* \ [[http://invensense.com/mems/gyro/mpu9150.html|invensense.com/mems/gyro/mpu9150.html}} \ \ \ \ \ \ \ \ \t\ \ \ \ \ \ \ \ \ \ \ \ \ \ \ \ \ \ \ \ \ \ \ \ \ \
| bgcolor=“00CCFF” | Prototype
| bgcolor=“white” | Basic Testing
|-
| bgcolor=“white” | Barometer:\
| bgcolor=“white” |
* Measurement Specialties MS5540-CM
* [[http://media.digikey.com/pdf/Data%20Sheets/Measurement%20Specialties%20PDFs/MS5540-CM.pdf|media.digikey.com/pdf/Data%20Sheets/Measurement%20Specialties%20PDFs/MS5540-CM.pdf}}
| bgcolor=“00CCFF” | Prototyped
| bgcolor=“white” | Basic Testing
|-
| bgcolor=“white” | SD Card:\t
| bgcolor=“white” |
| bgcolor=“00CCFF” | Prototyped\t
| bgcolor=“white” | Basic Testing
|-
| bgcolor=“white” | Bluetooth:\t
| bgcolor=“white” |
| bgcolor=“00CCFF” | Prototyped\t
| bgcolor=“white” | Basic Testing
|-
| bgcolor=“white” | Battery:\ \
| bgcolor=“white” | \
| bgcolor=“00CCFF” | Not Purchased
| bgcolor=“white” | Purchase
|-
| bgcolor=“white” | Battery Holder:\ \
| bgcolor=“white” | \
| bgcolor=“00CCFF” | Not Purchased\
| bgcolor=“white” | Purchase
|}
== Science Payload Specs ==
—-
== Science Payload Datasheets and Documentation ==
—-
Eagle files live here:
spacelab1.zip
=== Camera ===
—-
HABEX Camera
—-
Current list of cameras in the science payload. Tenative plan is a Canon SD450 running CHDK for still photography and a HackHD camera for taking HD video of ascent/descent

 Currently, the SD450 is listed as only rated to operate from 0-40C and the HackHD is listed at Sparkfun as operating from -10C-45C. It may be necessary to provide on-board heating to keep the cameras operational during flight. Investigate “ANTI-FOG STRIPS” as a solution. Electronics may need to be wrapped in kapton tape to keep moisture out.
== Camera Status ==
—-
{| border=“1”
|-
| bgcolor=“white” | \
Part\
| bgcolor=“white” | \
Dimensions\
| bgcolor=“white” | \
Status\
| bgcolor=“white” | \
Next Task\
|-
| bgcolor=“white” | Canon SD450 Still Camera:\
| bgcolor=“white” | 3.39“ x 2.11” x 0.85“ and is 119g (.26lbs)
| bgcolor=“00CCFF” | Purchased
| bgcolor=“white” | Prototyped
|-
| bgcolor=“white” | HackHD Video Camera:\
| bgcolor=“white” | 2.55” x 1.57“ x .98” and is 28g (.0617lbs)
| bgcolor=“00CCFF” | Not Purchased
| bgcolor=“white” | Weight-Acceptable Design Spec
|-
| bgcolor=“white” | HackHD Battery:\
| bgcolor=“white” | 90mm x 140mm x 10mm and is 80g(current criteria)
| bgcolor=“00CCFF” | Not Purchased
| bgcolor=“white” | Weight-Acceptable Design Spec
|-
| bgcolor=“white” | TOTAL:\
| bgcolor=“white” |
| bgcolor=“white” |
| bgcolor=“white” |
|}
== Camera Specs ==
—-
== Camera Datasheets and Documentation ==
—-
===== Hardware Testing =====
Hardware testing must be done on both the flight mechanical hardware to simulate conditions of near space as well as hardware testing on electronics to simulate operation in environmental conditions inside the body of the craft.
Information about EMC Testing: [[http://en.wikipedia.org/wiki/Electromagnetic_compatibility|http://en.wikipedia.org/wiki/Electromagnetic_compatibility}}
==== Environmental / Reliability Testing ====
—-
== Expected External Environmental Conditions ==
Thermal Minimum: -70C (Lowest Day Time Temperature at 100,000ft)
Thermal Maximum: +55C (Mohaves Record High Temperature)
Pressure Minimum: \ 1010 Pa (pascals) \ or 0.01atm (1% of pressure at sea level) \ (estimate pressure at 100,000ft)
Pressure Maximum: 101,325 Pa (pascals) \ or \ 1 atm \ (pressure at launch/landing site)
Humidity Minimum: \ 0% (Hot dry Mohave Desert)
Humidity Maximum: 100% (Flying through clouds)
== Expected Internal Environmental Conditions ==
Thermal Minimum: -40C
Thermal Maximum: +50C
Pressure Minimum: \ 1010 Pa (pascals) \ or 0.01atm (1% of pressure at sea level) \ (estimate pressure at 100,000ft)
Pressure Maximum: 101,325 Pa (pascals) \ or \ 1 atm \ (pressure at launch/landing site)
Humidity Minimum: \ 0%
Humidity Maximum: 80%
Currently, the SD450 is listed as only rated to operate from 0-40C and the HackHD is listed at Sparkfun as operating from -10C-45C. It may be necessary to provide on-board heating to keep the cameras operational during flight. Investigate “ANTI-FOG STRIPS” as a solution. Electronics may need to be wrapped in kapton tape to keep moisture out.
== Camera Status ==
—-
{| border=“1”
|-
| bgcolor=“white” | \
Part\
| bgcolor=“white” | \
Dimensions\
| bgcolor=“white” | \
Status\
| bgcolor=“white” | \
Next Task\
|-
| bgcolor=“white” | Canon SD450 Still Camera:\
| bgcolor=“white” | 3.39“ x 2.11” x 0.85“ and is 119g (.26lbs)
| bgcolor=“00CCFF” | Purchased
| bgcolor=“white” | Prototyped
|-
| bgcolor=“white” | HackHD Video Camera:\
| bgcolor=“white” | 2.55” x 1.57“ x .98” and is 28g (.0617lbs)
| bgcolor=“00CCFF” | Not Purchased
| bgcolor=“white” | Weight-Acceptable Design Spec
|-
| bgcolor=“white” | HackHD Battery:\
| bgcolor=“white” | 90mm x 140mm x 10mm and is 80g(current criteria)
| bgcolor=“00CCFF” | Not Purchased
| bgcolor=“white” | Weight-Acceptable Design Spec
|-
| bgcolor=“white” | TOTAL:\
| bgcolor=“white” |
| bgcolor=“white” |
| bgcolor=“white” |
|}
== Camera Specs ==
—-
== Camera Datasheets and Documentation ==
—-
===== Hardware Testing =====
Hardware testing must be done on both the flight mechanical hardware to simulate conditions of near space as well as hardware testing on electronics to simulate operation in environmental conditions inside the body of the craft.
Information about EMC Testing: [[http://en.wikipedia.org/wiki/Electromagnetic_compatibility|http://en.wikipedia.org/wiki/Electromagnetic_compatibility}}
==== Environmental / Reliability Testing ====
—-
== Expected External Environmental Conditions ==
Thermal Minimum: -70C (Lowest Day Time Temperature at 100,000ft)
Thermal Maximum: +55C (Mohaves Record High Temperature)
Pressure Minimum: \ 1010 Pa (pascals) \ or 0.01atm (1% of pressure at sea level) \ (estimate pressure at 100,000ft)
Pressure Maximum: 101,325 Pa (pascals) \ or \ 1 atm \ (pressure at launch/landing site)
Humidity Minimum: \ 0% (Hot dry Mohave Desert)
Humidity Maximum: 100% (Flying through clouds)
== Expected Internal Environmental Conditions ==
Thermal Minimum: -40C
Thermal Maximum: +50C
Pressure Minimum: \ 1010 Pa (pascals) \ or 0.01atm (1% of pressure at sea level) \ (estimate pressure at 100,000ft)
Pressure Maximum: 101,325 Pa (pascals) \ or \ 1 atm \ (pressure at launch/landing site)
Humidity Minimum: \ 0%
Humidity Maximum: 80%
 RF Testing, to be defined later, will involve testing the rf outputs of all tracking devices. Specs will be reviewed and documented to assure that there is no interference between devices and so the team know what radios to prepare.
Complete Systems Testing, to be defined later, will involve testing the entire payload at the same time for 8 hours to simulate a flight.
==== Environmental Thermal Vacuum Chamber ====
—-
In order to simulate the conditions of high altitude flight we must either buy or build our own thermal-vac chamber. Since commercial ones cost more than $10k, we will be designing, and building our own low cost thermal-vac chamber.
Details can be found here: [[Thermal Vac Chamber}}
RF Testing, to be defined later, will involve testing the rf outputs of all tracking devices. Specs will be reviewed and documented to assure that there is no interference between devices and so the team know what radios to prepare.
Complete Systems Testing, to be defined later, will involve testing the entire payload at the same time for 8 hours to simulate a flight.
==== Environmental Thermal Vacuum Chamber ====
—-
In order to simulate the conditions of high altitude flight we must either buy or build our own thermal-vac chamber. Since commercial ones cost more than $10k, we will be designing, and building our own low cost thermal-vac chamber.
Details can be found here: [[Thermal Vac Chamber}}


 ==== Hardware Status ====
—-
==== Hardware Status ====
—-
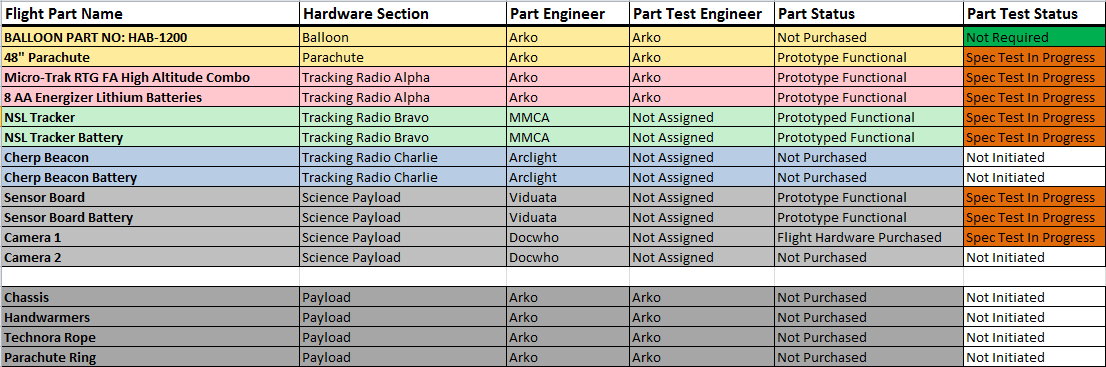 Download Test Status: habex_test_status.xlsx
===== Launch =====
==== Launch Information ====
* Launch Time/Date: Current Launch date is set to Saturday March 30th, 2013 at 10:00am
* Launch Location: Latitude 34.1318 deg N , Longitude -115.9094 deg W , Altitude 395m
* Launch/Landing Estimated Time Duration: 2 Hours 00 Minutes
==== Packing List ====
The Following list does not include the details flight hardware, please refer to flight hardware list
- Bottles of Helium (at least 5000L)
- Extra Helium
- Value Adapters
- Balloon Filling Station with gauges and values
- Tarp
- Gloves
- Technora
- Duct Tape
- Metcal and Solder
- Multimeter
- Ham radios (2 meter, 20cm), digital decoder or laptop
- Audio cables (male/male headphone jack)
- Laptops with MixW (interface with decoder)
- Flight Hardware (Specified): Balloon, Rope, Parachute, Payload
- Scale for weighing payload
- Spring Scale for measure balloon necklift
==== Team ====
TELL ME WHERE TO GO (“UNDECIDED” or “I don't know which team to join..”)
* sandplum
all I have is a screwdriver…. can I join anyway?
* Fritz - Can't do wiki but has a General Class License
* JGalt
TH-F6A triband HT (2M/220/440
directional antenna for 2m/440 (handheld beam)
argent data T2-301 with nuvi350 - this makes for a complete aprs station complete with display and messaging without needing a laptop. will also send aprs data to usb or rs-232 serial port for use with laptop. (T2-301 is a full 2m tranciever and tnc in one box, nuvi350 adds display and messaging) may consider loaning this out for the day to equip a 2nd chase vehicle.
laptop computer
extra class ham license.
May need to ride with someone or may have vehicle TBD
* Blakangel
- A full size car
- Two ham radios w/ VHF. Various other receivers w/ VHF band and speaker output
- various antennas (one or two mag mount i think), coax cabling, connectors, adapters.
- Tools, experience building RF cable assemblies and antennas
- I have 4 or 5 RTL-SDR (r820T) dongles i bought to donate to NSL for SDR radio stuff. I also have a few personal dongles (e4000 tuner and r820t)
- laptops with sdr software. (work laptop and personal laptop)
* CHRIS
- May or may not have a car - Will have 2 radios, hoping to get licensed before March - Totes have a laptop
* skroo
- Light-duty 4×4 (lifted Subaru Forester, able to lock transfer case for real 4WD)
- Radios: Yaesu VX-5 and FT-8900 (FT-8900 is built into ammo can with 17Ah battery for portability)
- Pair of ex-cop ruggedised GSM/GPS radios (designed for vehicular use position reporting; have full 2.5G GSM radios built-in)
- Standalone GPS (Garmin GPSmap 60CSX)
- Laptop and phone with various ham radio packages installed
- Echolink & aprs.fi verified
- Familiar with general area, terrain, and environment
* sign up here - (please list what equipment you have and what you can do)
Alpha Team
* FLIGHT
* Arko
* Skape
* Davo
* COMM
* BB
* Jayen
* GROUND NORTH
* Sign up here
* GROUND\ EAST
* Cnelson
* A bunch of ninjas
* GROUND\ SOUTH
* Braddock Gaskill braddock@braddock.com
* Sign up here
Bravo Team
* MMCA
* Charliex
Charlie Team
* Arclight
Science Team
* Viduata
Camera Team
* Docwho
==== Capabilities ====
* Must be able to prepare and launch balloon
* Must be able to communicate with the payload before & after launch\
* Must be able to read and properly execute pre-flight check list
==== Launch Conditions ====
* Predicted landing zone is clear within a certain radius
* Using multiple tools to predict landing site
* Change parameters within error to get a better idea of the landing site
TODO:
* Make a map of “bad” or “non accessible” zones (bad mountains, water, etc.)
==== Launch Procedure ====
Stage 0:
- Weather predictor shows good landing location, run with multiple scenarios, run on different predictors (use different websites too).
- Import flight prediction kml into google earth and check it against the “LAND ZONE” and “AIRSPACE” kml's, as well as visual inspection with at least 2 other people looking it over.
- Projected launch window is good and a GO
- Final mass is within error
- Launch and Recovery Teams are at their given locations (could change based on weather predictor)
- Radio communication is good
Stage 1:
- Inspect Balloon for tears or errors
- Measure neck lift of balloon, do this in low wind conditions
- Check rope for tears or errors
- Check rope tie points
- Check parachute for tears or errors
- Inspect payload tie points and harness
- Check temperature of electronics
- Check ALL battery voltages
- Connect ALL batteries
Stage 2:
- Power on Radio Alpha
- Check Radio Alpha functionality
- Ensure GPS Lock
- Check for valid packets
- Listen to transmission for any volume anomalies
- Assure nothing else is transmitting around the same time
- Check laptop/ham, make sure volume is tuned well, No SQL, make sure connections are good.
- Check with all Alpha Team ground units, assure their equipment is functional.
- Receive at least 8 APRS Packets
- Check with the Alpha Team ground units to see if they are receiving a signal
- Requirement is that launch site can decode the APRS with TWO separate setups
- Check aprs.fi
- Check temperature of Radio Alpha Electronics
- Check Radio Alpha connections to assure they are connected, fit, and locked/tied in
- Check for possible hazards like things getting caught and pulling on connectors
- Log APRS packets
- Alpha Team equipment is functional, everyone is GO
- Radio Alpha is GO
Stage 3:
- Power on Radio Bravo
- Check Radio Bravo functionality
- Receive at least 8 text messages with GPS location
- Check temperature of Radio Bravo
- Check Radio Bravo connections to assure they are connected, fit, and locked/tied in
- Check for possible hazards like things getting caught and pulling on connectors
- Receive 2 more text messages with GPS location
- Bravo Team equipment is functional, everyone is GO
- Radio Bravo is GO
Stage 4:
- Power on Radio Charlie
- Check Radio Charlie functionality
- Check all antennas, signal gain, and radios
- Check temperature of Radio Charlie
- Check Radio Charlie connections to assure they are connected, fit, and locked/tied in
- Check for possible hazards like things getting caught and pulling on connectors
- Charlie Team equipment is functional, everyone is GO
- Radio Charlie is GO
Stage 5:
- Power on Science Payload
- Check Science Payload functionality
- Verify SD Card is installed
- Pull Data for a test (not required)
- Check Science Payload Temperature
- Check any connections to the Science Payload, assure they are connected, fit, and locked/tied in
- Check for possible hazards like things getting caught and pulling on connectors
- Science Payload equipment is functional
- Science Payload is GO
Stage 6:
- Power on Camera
- Check Camera functionality
- Verify SD Card is installed
- Pull Images for a test
- Check Camera Temperature
- Check any connections to the Camera, assure they are connected, fit, and locked/tied in
- Check for possible hazards like things getting caught and pulling on connectors
- Camera equipment is functional
- Camera is GO
Stage 6:
- Allow all electronics to run at the same time for at least 15 minutes with NO anomalies
- Weigh the payload with parachute
- Check for any loose parts, assure nothing can detach, break off, move/bounce around inside or outside
- Check tie to parachute rope for tears or errors, assure a tight connection
- Winds on ground a calm for launch
- Every radio is functional and none of the radios are interfering
- Call FAA (either ZLA ARTCC or SoCal TRACON as appropriate) and notify them the time of launch
- Begin audio/video recording
- Begin audio recording of telemetry radios (APRS radios)
- Begin audio recording of communication radios
- Check in with everyone, get a GO from all teams
- HABEX2 is ready for launch
- Launch the damn thing!
===== HABEX Flight Prediction Software (Powered by the CUSF Hourly Predictor) =====
In Progress
Servers are being configured to run a cron job once every 6 hours with new weather data to predict the landing path of HABEX for each hour of the next 24 hours. These records will be kept to create a statistical analysis of different launch sites and to determine the optimal launch/landing zones.
Instructions:
1) Download and install: [[https://github.com/cuspaceflight/cusf-landing-prediction|https://github.com/cuspaceflight/cusf-landing-prediction}}
2) Follow: [[http://pastebin.com/vvB2VySE|http://pastebin.com/vvB2VySE}}
3) compile the C program inside pred_src
4) cmake libglib and build-essential
The following is an hourly prediction of the HABEX launch. The path trajectory is calculated for each hour and the landing spot for that hour is represented by a single red dot. The way to translate this data you are seeing is like this. The launch location is the same. Imagine being at that launch location with HABEX and launching it on hour 1, it will take off, rise, burst, and land. That landing location is represented by a single red dot. The following red dots are where it would land if you were launch it each proceeding hour.
This is very helpful in that you can see where it will be landing in the hours ahead. This was developed by CUSF.
Click the red dots to see the path.
==== HABEX Hourly Predictor - Launch Location: Twentynine Palms ====
<html>
<iframe width=100% height=600px src=“http://local.excitedbit.com:6969/HABEX”/></iframe>
</html>
==== HABEX Hourly Predictor - Launch Location: Monrovia, CA ====
<html>
<iframe width=100% height=600px src=“http://local.excitedbit.com:6969/HABEX_ALT1”/></iframe>
</html>
==== HABEX Hourly Predictor - Launch Location: Indio ====
<html>
<iframe width=100% height=600px src=“http://local.excitedbit.com:6969/HABEX_ALT2”/></iframe>
</html>
==== HABHUB Predictor ====
<html>
<iframe width=100% height=600px src=“http://habhub.org/predict/”/></iframe>
</html>
Here we observe other launches altitude data:
Ascent:
Download Test Status: habex_test_status.xlsx
===== Launch =====
==== Launch Information ====
* Launch Time/Date: Current Launch date is set to Saturday March 30th, 2013 at 10:00am
* Launch Location: Latitude 34.1318 deg N , Longitude -115.9094 deg W , Altitude 395m
* Launch/Landing Estimated Time Duration: 2 Hours 00 Minutes
==== Packing List ====
The Following list does not include the details flight hardware, please refer to flight hardware list
- Bottles of Helium (at least 5000L)
- Extra Helium
- Value Adapters
- Balloon Filling Station with gauges and values
- Tarp
- Gloves
- Technora
- Duct Tape
- Metcal and Solder
- Multimeter
- Ham radios (2 meter, 20cm), digital decoder or laptop
- Audio cables (male/male headphone jack)
- Laptops with MixW (interface with decoder)
- Flight Hardware (Specified): Balloon, Rope, Parachute, Payload
- Scale for weighing payload
- Spring Scale for measure balloon necklift
==== Team ====
TELL ME WHERE TO GO (“UNDECIDED” or “I don't know which team to join..”)
* sandplum
all I have is a screwdriver…. can I join anyway?
* Fritz - Can't do wiki but has a General Class License
* JGalt
TH-F6A triband HT (2M/220/440
directional antenna for 2m/440 (handheld beam)
argent data T2-301 with nuvi350 - this makes for a complete aprs station complete with display and messaging without needing a laptop. will also send aprs data to usb or rs-232 serial port for use with laptop. (T2-301 is a full 2m tranciever and tnc in one box, nuvi350 adds display and messaging) may consider loaning this out for the day to equip a 2nd chase vehicle.
laptop computer
extra class ham license.
May need to ride with someone or may have vehicle TBD
* Blakangel
- A full size car
- Two ham radios w/ VHF. Various other receivers w/ VHF band and speaker output
- various antennas (one or two mag mount i think), coax cabling, connectors, adapters.
- Tools, experience building RF cable assemblies and antennas
- I have 4 or 5 RTL-SDR (r820T) dongles i bought to donate to NSL for SDR radio stuff. I also have a few personal dongles (e4000 tuner and r820t)
- laptops with sdr software. (work laptop and personal laptop)
* CHRIS
- May or may not have a car - Will have 2 radios, hoping to get licensed before March - Totes have a laptop
* skroo
- Light-duty 4×4 (lifted Subaru Forester, able to lock transfer case for real 4WD)
- Radios: Yaesu VX-5 and FT-8900 (FT-8900 is built into ammo can with 17Ah battery for portability)
- Pair of ex-cop ruggedised GSM/GPS radios (designed for vehicular use position reporting; have full 2.5G GSM radios built-in)
- Standalone GPS (Garmin GPSmap 60CSX)
- Laptop and phone with various ham radio packages installed
- Echolink & aprs.fi verified
- Familiar with general area, terrain, and environment
* sign up here - (please list what equipment you have and what you can do)
Alpha Team
* FLIGHT
* Arko
* Skape
* Davo
* COMM
* BB
* Jayen
* GROUND NORTH
* Sign up here
* GROUND\ EAST
* Cnelson
* A bunch of ninjas
* GROUND\ SOUTH
* Braddock Gaskill braddock@braddock.com
* Sign up here
Bravo Team
* MMCA
* Charliex
Charlie Team
* Arclight
Science Team
* Viduata
Camera Team
* Docwho
==== Capabilities ====
* Must be able to prepare and launch balloon
* Must be able to communicate with the payload before & after launch\
* Must be able to read and properly execute pre-flight check list
==== Launch Conditions ====
* Predicted landing zone is clear within a certain radius
* Using multiple tools to predict landing site
* Change parameters within error to get a better idea of the landing site
TODO:
* Make a map of “bad” or “non accessible” zones (bad mountains, water, etc.)
==== Launch Procedure ====
Stage 0:
- Weather predictor shows good landing location, run with multiple scenarios, run on different predictors (use different websites too).
- Import flight prediction kml into google earth and check it against the “LAND ZONE” and “AIRSPACE” kml's, as well as visual inspection with at least 2 other people looking it over.
- Projected launch window is good and a GO
- Final mass is within error
- Launch and Recovery Teams are at their given locations (could change based on weather predictor)
- Radio communication is good
Stage 1:
- Inspect Balloon for tears or errors
- Measure neck lift of balloon, do this in low wind conditions
- Check rope for tears or errors
- Check rope tie points
- Check parachute for tears or errors
- Inspect payload tie points and harness
- Check temperature of electronics
- Check ALL battery voltages
- Connect ALL batteries
Stage 2:
- Power on Radio Alpha
- Check Radio Alpha functionality
- Ensure GPS Lock
- Check for valid packets
- Listen to transmission for any volume anomalies
- Assure nothing else is transmitting around the same time
- Check laptop/ham, make sure volume is tuned well, No SQL, make sure connections are good.
- Check with all Alpha Team ground units, assure their equipment is functional.
- Receive at least 8 APRS Packets
- Check with the Alpha Team ground units to see if they are receiving a signal
- Requirement is that launch site can decode the APRS with TWO separate setups
- Check aprs.fi
- Check temperature of Radio Alpha Electronics
- Check Radio Alpha connections to assure they are connected, fit, and locked/tied in
- Check for possible hazards like things getting caught and pulling on connectors
- Log APRS packets
- Alpha Team equipment is functional, everyone is GO
- Radio Alpha is GO
Stage 3:
- Power on Radio Bravo
- Check Radio Bravo functionality
- Receive at least 8 text messages with GPS location
- Check temperature of Radio Bravo
- Check Radio Bravo connections to assure they are connected, fit, and locked/tied in
- Check for possible hazards like things getting caught and pulling on connectors
- Receive 2 more text messages with GPS location
- Bravo Team equipment is functional, everyone is GO
- Radio Bravo is GO
Stage 4:
- Power on Radio Charlie
- Check Radio Charlie functionality
- Check all antennas, signal gain, and radios
- Check temperature of Radio Charlie
- Check Radio Charlie connections to assure they are connected, fit, and locked/tied in
- Check for possible hazards like things getting caught and pulling on connectors
- Charlie Team equipment is functional, everyone is GO
- Radio Charlie is GO
Stage 5:
- Power on Science Payload
- Check Science Payload functionality
- Verify SD Card is installed
- Pull Data for a test (not required)
- Check Science Payload Temperature
- Check any connections to the Science Payload, assure they are connected, fit, and locked/tied in
- Check for possible hazards like things getting caught and pulling on connectors
- Science Payload equipment is functional
- Science Payload is GO
Stage 6:
- Power on Camera
- Check Camera functionality
- Verify SD Card is installed
- Pull Images for a test
- Check Camera Temperature
- Check any connections to the Camera, assure they are connected, fit, and locked/tied in
- Check for possible hazards like things getting caught and pulling on connectors
- Camera equipment is functional
- Camera is GO
Stage 6:
- Allow all electronics to run at the same time for at least 15 minutes with NO anomalies
- Weigh the payload with parachute
- Check for any loose parts, assure nothing can detach, break off, move/bounce around inside or outside
- Check tie to parachute rope for tears or errors, assure a tight connection
- Winds on ground a calm for launch
- Every radio is functional and none of the radios are interfering
- Call FAA (either ZLA ARTCC or SoCal TRACON as appropriate) and notify them the time of launch
- Begin audio/video recording
- Begin audio recording of telemetry radios (APRS radios)
- Begin audio recording of communication radios
- Check in with everyone, get a GO from all teams
- HABEX2 is ready for launch
- Launch the damn thing!
===== HABEX Flight Prediction Software (Powered by the CUSF Hourly Predictor) =====
In Progress
Servers are being configured to run a cron job once every 6 hours with new weather data to predict the landing path of HABEX for each hour of the next 24 hours. These records will be kept to create a statistical analysis of different launch sites and to determine the optimal launch/landing zones.
Instructions:
1) Download and install: [[https://github.com/cuspaceflight/cusf-landing-prediction|https://github.com/cuspaceflight/cusf-landing-prediction}}
2) Follow: [[http://pastebin.com/vvB2VySE|http://pastebin.com/vvB2VySE}}
3) compile the C program inside pred_src
4) cmake libglib and build-essential
The following is an hourly prediction of the HABEX launch. The path trajectory is calculated for each hour and the landing spot for that hour is represented by a single red dot. The way to translate this data you are seeing is like this. The launch location is the same. Imagine being at that launch location with HABEX and launching it on hour 1, it will take off, rise, burst, and land. That landing location is represented by a single red dot. The following red dots are where it would land if you were launch it each proceeding hour.
This is very helpful in that you can see where it will be landing in the hours ahead. This was developed by CUSF.
Click the red dots to see the path.
==== HABEX Hourly Predictor - Launch Location: Twentynine Palms ====
<html>
<iframe width=100% height=600px src=“http://local.excitedbit.com:6969/HABEX”/></iframe>
</html>
==== HABEX Hourly Predictor - Launch Location: Monrovia, CA ====
<html>
<iframe width=100% height=600px src=“http://local.excitedbit.com:6969/HABEX_ALT1”/></iframe>
</html>
==== HABEX Hourly Predictor - Launch Location: Indio ====
<html>
<iframe width=100% height=600px src=“http://local.excitedbit.com:6969/HABEX_ALT2”/></iframe>
</html>
==== HABHUB Predictor ====
<html>
<iframe width=100% height=600px src=“http://habhub.org/predict/”/></iframe>
</html>
Here we observe other launches altitude data:
Ascent: 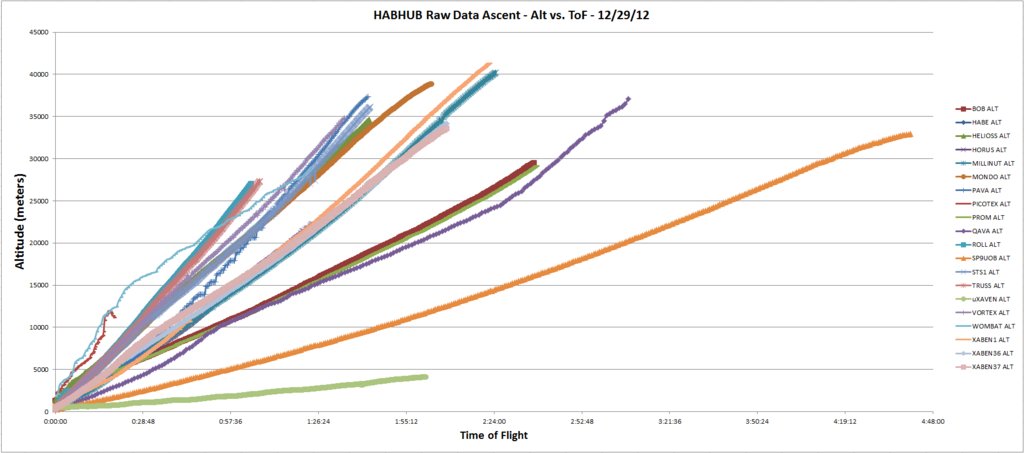 Decent:
 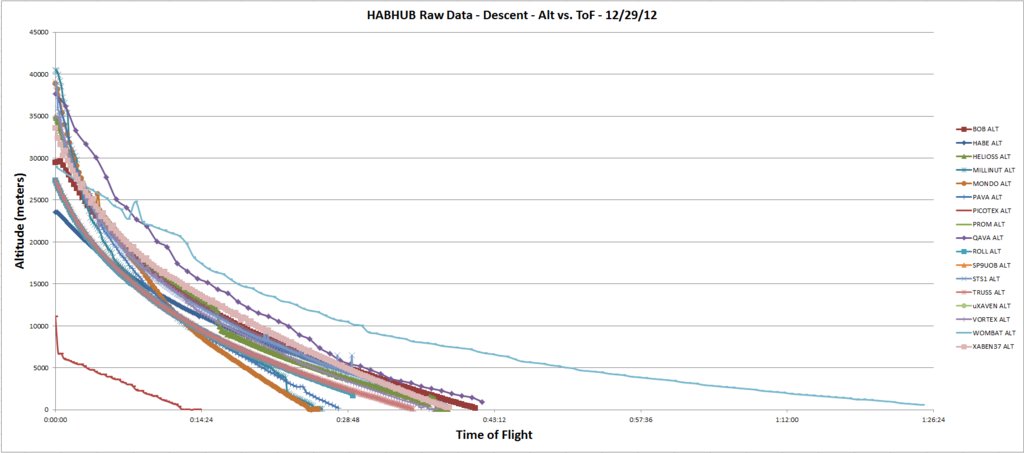 ===== Other Prediction Software =====
[[http://weather.uwyo.edu/polar/balloon_traj.html|http://weather.uwyo.edu/polar/balloon_traj.html}}
[[http://habhub.org/predict/|http://habhub.org/predict/}}
[[http://www.gpsvisualizer.com/map_input?form=googleearth|http://www.gpsvisualizer.com/map_input?form=googleearth}} <— Use this to convert csv to kml
===== Tracking/Recovery =====
Each week and the days leading to launch, simulations will be done to determine the optimal launch and recovery zones. Teams will be dispersed accordingly. Briefings will be held in the weeks leading to launch and recovery day.
Supplies and coordination will be clarified as we finalize the design.
TODO:
* Create a map of radio range overlapped with predicted flight path.
* Get audio recordings of the APRS radios
* Get audio recordings of HAM net (ground communication)
ALL TEAMS - REQUIRED EQUIPMENT
* Reliable vehicle
* Full tank of gas
* 2m/70cm communications radio (at least 1 per car, separate from tracking radios)
* AAA or Delorme map of California
* Charger for communication radio and/or spare batteries
* Cell phone with charger
* 1 gallon of water per vehicle
* Food and snacks for 24 hours
* Flashlight
* GPS (hand-held or vehicle mounted)
* Laptop (with audio mic input)
* Laptop Charger
* Power Inverter (Car plug to AC)
* Audio cables and any adapters for tracking
* Mag mount antenna, backup antenna
* RF connectors
Optional Equipment:
* Sleeping bag and tarp/tent
* Headlamp for night recovery
* Day pack as hiking may be required
Off-road Recovery units - Suggested equipment
* High-clearance 4WD vehicle with fresh service (fluids, tires, etc)
* Full-size spare tire
* 1 gallon of water per person
* Overnight supplies, including sleeping bags for each person
* Vehicle-mounted radio or HT radio with external antenna
* Shovel
* Recovery strap (20' min)
* Hi-lift jack
* Delorme Atlas for California/Nevada/Arizona or other maps (can be digital)
* Hand-held GPS
* Magnetic compass
Wilderness Recovery units - Required equipment
* Sturdy hiking shoes
* Hat, sunglasses, weather-appropriate clothing
* Day pack
* 2 liters of water
* Magnetic compass with declination
* Paper maps as needed
* Hand-held GPS
* Headlamp with spare batteries
* Reliable 2m HT (2+ per group)
* Snacks and overnight supplies
* Matches or ligher
* Rain gear
==== Alpha Tracking Team ====
Team will have 3g/4g hotspots as well as ham radios (2m,70cm) with digital decoders, omni and directional antennas. The team will use these tools to track the flight of craft.
Radio's must be able to tune to 144.390Mhz and decode APRS (AX25 encoding)
Radio audio outputs can be connected to a computer a decoded using:
Antennas:
Ideally we would like to use a quadrifilar helicoidal antenna:
[[http://jcoppens.com/ant/qfh/calc.en.php|http://jcoppens.com/ant/qfh/calc.en.php}}
[[http://www.g4ilo.com/qfh.html|http://www.g4ilo.com/qfh.html}}
Hex Editor/Converter:
Please have a hex editor/converter handy:
[[https://www.google.com/search?q=hex+editor&ie=utf-8&oe=utf-8|https://www.google.com/search?q=hex+editor&ie=utf-8&oe=utf-8}}
[[http://home.paulschou.net/tools/xlate/|http://home.paulschou.net/tools/xlate/}}
Android APRS Decoder (mic input): [[https://play.google.com/store/apps/details?id=org.aprsdroid.app&hl=en|https://play.google.com/store/apps/details?id=org.aprsdroid.app&hl=en}}
Software TNC:
MixW - APRS Decoder: [[http://polysat.calpoly.edu/earthstation/software/mixw/index.php|http://polysat.calpoly.edu/earthstation/software/mixw/index.php}} <– If it doesn't load, try Google Cache:[[http://webcache.googleusercontent.com/search?q=cache:QeQpeGckl2YJ:polysat.calpoly.edu/earthstation/software/mixw/index.php+&cd=1&hl=en&ct=clnk&gl=us&client=firefox-a|http://webcache.googleusercontent.com/search?q=cache:QeQpeGckl2YJ:polysat.calpoly.edu/earthstation/software/mixw/index.php+&cd=1&hl=en&ct=clnk&gl=us&client=firefox-a}}
Install Instructions: [[http://www.twarc.org/departments/digital-modes/agwpe---free-version/agwpe-freeware|http://www.twarc.org/departments/digital-modes/agwpe---free-version/agwpe-freeware}}
APRS ISCE - APRS Decoder: [[http://aprsisce.wikidot.com/|http://aprsisce.wikidot.com/}}
QTMM - APRS Decoder: [[http://sourceforge.net/projects/qtmm/|http://sourceforge.net/projects/qtmm/}}
Physical TNC: Radio audio outputs can also be connected to a physical TNC: [[http://www.mfjenterprises.com/pdffiles/MFJ-1270X.pdf|http://www.mfjenterprises.com/pdffiles/MFJ-1270X.pdf}}
==== Bravo Tracking Team ====
Team will have cellphones. And strippers, lots of strippers.
==== Charlie Tracking Team ====
Team will have directional antennas with appropriate gear to triangulate and calculate the position of the craft. Charlie beacon will be [[http://www.bigredbee.com/BeeLine.htm|Big Red Bee}} on 433.920Mhz, FM with tone and tone-based CW callsign ID.
Equipment for Charlie team includes:
* Basic team equipment above
* 70cm tracking antenna such as [[http://www.nr6ca.org/70cmyagi.html|Simple 70cm Yagi}}
* HAM Radio or scanner capable of receiving 70cm. Should also have a bar-graph or meter for signal strength
* Magnetic compass with adjustable declination
* Hand-held GPS
* Optional 2m tracking antenna for RDF on the 2m beacon
* Laptop running Maptech Pro (team leader)
==== APRS decoding with an SDR or Ham Radio/Audio Output ====
—-
=== Step 1: Obtain the appropriate hardware ===
In terms of hardware, there are two ways to receive APRS data:
- Use a [[https://dx.com/p/usb-dvb-t-tv-dongle-with-remote-8309|cheap DVB-T dongle}} as your receiver. Be sure to get one with the RTL283x chipset; you'll have to use Google to find out which ones do or do not have this. We've had good luck with ones using the RTL2838UHIDIR.
- Use a real Ham Radio, buy or create an audio cable that connects the speaker output of the radio to the computer audio input, have the software decode the radio's audio
—-
=== Step 2: Obtain the appropriate software ===
== Windows ==
Using SDR#:
* Follow directions at the below link to get SDR# set up:\ [[http://rtlsdr.org/softwarewindows|rtlsdr.org/softwarewindows}}
* Radio WFM
* Filter Bandwidth 14000
* VFO Approx 144 MHz
* Install MixW\ [[http://mixw.net/index.php?j=downloads|mixw.net/index.php}}
In MixW:
* Set Mode -> Packet
* Set Mode -> Mode Settings -> Modem -> VHF 1200 baud (Standard)
* Go to Configure -> Sound Device Settings
* Select your Stereo Mix for Input
* Speakers for output (to monitor)
If the above doesn't work you may have a shitty sound card like CHRIS. Download (TPB) and install Virtual Audio Cable. Install the device and set SDR# to send out to it. Set MixW to read from it.
== OS X ==
APRS packets have successfully been decoded using the [[http://dekar.wc3edit.net/2012/09/30/osx-port-of-the-awesome-gqrx-sdr-software/|gqrx SDR}} and one of the cheapo DVB-T dongles with the RTL2838UHIDIR chipset. This was under OS X 10.8.2 (two days later, 10.8.3) with gqrx installed from gqrx_7.dmg and the laughably-terrible antenna supplied with the DVB-T dongle.
Some notes about gqrx:
* The dongle worked out-of-the-box with no special configuration. If you don't hear anything, turn up the gain under 'receiver options'
* Expect +/- 20Khz variation from intended receive frequency with the dongle
* Filter was set to User @ 50Khz, mode: narrow FM. Hand-trimming the filter width was necessary
* Start the AFSK1200 decoder before starting the DSP; starting it after may audibly slur / corrupt the audio, meaning you can't decode APRS packets
* Squelch has no fine adjustment, so expect to have to alter gain (also no fine adjustment) to compensate
* Turning on audio recording will, by default, annoyingly save the .wav files generated to whatever directory you installed gqrx to. If that's /Applications, look there
== Cross-platform (XASTIR) ==
If you feel like stepping into the wonderful world of software that nobody has really tested yet, check out [[http://www.xastir.org/wiki/Main_Page|XASTIR}}. We're not saying it's not good software, just that none of us are actually using it so can't comment on its usefulness. However, it's supposed to be really awesome for APRS and apparently runs on every platform under the sun. Yay!
= A note about XASTIR on OS X =
Because OS X does things in weird ways, it's recommended to get XASTIR in pre-built form from [[http://www.nh6z.net/Amatuer_Radio_Station_NH6Z/Other_Peoples_Software.html|here}}. Read the instructions before trying to install it; you'll save yourself a lot of heartache. It will also require the current version of [[http://xquartz.macosforge.org/landing/|XQuartz}} in order to work. Note that this is presently untested though it is confirmed as at least installable and executable on OS X 10.8.3. The map data seems to be taking forfreakingever to download and install; YMMV.
XASTIR is available in [[https://www.macports.org/|Macports}}, but it's a slightly older version and doesn't build properly - at least, that's the case under XCode 4.6.1. Just get the binaries.
—-
=== Step 3: Decode the captured packets ===
Offline Method (RECOMMENDED):
* APRS Decoder for Windows: \ \ [[http://habexproject.org/mice/habex_2_aprs_win.zip|HABEX_2_APRS Windows}}
* APRS Decoder for Mac: \ [[http://habexproject.org/mice/habex_2_aprs_mac.zip|HABEX_2_APRS Mac}}
* APRS Decoder for Linux: \ [[http://habexproject.org/mice/habex_2_aprs_linux.zip|HABEX_2_APRS Linux}}
Online Method (Use only if you have an internet connection):
* There is a tool for online APRS packet decoding at [[http://mice.habexproject.org|mice.habexproject.org}}. Follow the instructions there (if you can copy & paste, this should not be difficult) and you'll be able to see the positioning data as both human-readable text and a pointer on a map.
—-
==== Landing Zones ====
—-
Anything that is not an Orange or Red Zone is an OK landing site:
DOWNLOAD THE KML: habex_no_land_zones.7z
===== Other Prediction Software =====
[[http://weather.uwyo.edu/polar/balloon_traj.html|http://weather.uwyo.edu/polar/balloon_traj.html}}
[[http://habhub.org/predict/|http://habhub.org/predict/}}
[[http://www.gpsvisualizer.com/map_input?form=googleearth|http://www.gpsvisualizer.com/map_input?form=googleearth}} <— Use this to convert csv to kml
===== Tracking/Recovery =====
Each week and the days leading to launch, simulations will be done to determine the optimal launch and recovery zones. Teams will be dispersed accordingly. Briefings will be held in the weeks leading to launch and recovery day.
Supplies and coordination will be clarified as we finalize the design.
TODO:
* Create a map of radio range overlapped with predicted flight path.
* Get audio recordings of the APRS radios
* Get audio recordings of HAM net (ground communication)
ALL TEAMS - REQUIRED EQUIPMENT
* Reliable vehicle
* Full tank of gas
* 2m/70cm communications radio (at least 1 per car, separate from tracking radios)
* AAA or Delorme map of California
* Charger for communication radio and/or spare batteries
* Cell phone with charger
* 1 gallon of water per vehicle
* Food and snacks for 24 hours
* Flashlight
* GPS (hand-held or vehicle mounted)
* Laptop (with audio mic input)
* Laptop Charger
* Power Inverter (Car plug to AC)
* Audio cables and any adapters for tracking
* Mag mount antenna, backup antenna
* RF connectors
Optional Equipment:
* Sleeping bag and tarp/tent
* Headlamp for night recovery
* Day pack as hiking may be required
Off-road Recovery units - Suggested equipment
* High-clearance 4WD vehicle with fresh service (fluids, tires, etc)
* Full-size spare tire
* 1 gallon of water per person
* Overnight supplies, including sleeping bags for each person
* Vehicle-mounted radio or HT radio with external antenna
* Shovel
* Recovery strap (20' min)
* Hi-lift jack
* Delorme Atlas for California/Nevada/Arizona or other maps (can be digital)
* Hand-held GPS
* Magnetic compass
Wilderness Recovery units - Required equipment
* Sturdy hiking shoes
* Hat, sunglasses, weather-appropriate clothing
* Day pack
* 2 liters of water
* Magnetic compass with declination
* Paper maps as needed
* Hand-held GPS
* Headlamp with spare batteries
* Reliable 2m HT (2+ per group)
* Snacks and overnight supplies
* Matches or ligher
* Rain gear
==== Alpha Tracking Team ====
Team will have 3g/4g hotspots as well as ham radios (2m,70cm) with digital decoders, omni and directional antennas. The team will use these tools to track the flight of craft.
Radio's must be able to tune to 144.390Mhz and decode APRS (AX25 encoding)
Radio audio outputs can be connected to a computer a decoded using:
Antennas:
Ideally we would like to use a quadrifilar helicoidal antenna:
[[http://jcoppens.com/ant/qfh/calc.en.php|http://jcoppens.com/ant/qfh/calc.en.php}}
[[http://www.g4ilo.com/qfh.html|http://www.g4ilo.com/qfh.html}}
Hex Editor/Converter:
Please have a hex editor/converter handy:
[[https://www.google.com/search?q=hex+editor&ie=utf-8&oe=utf-8|https://www.google.com/search?q=hex+editor&ie=utf-8&oe=utf-8}}
[[http://home.paulschou.net/tools/xlate/|http://home.paulschou.net/tools/xlate/}}
Android APRS Decoder (mic input): [[https://play.google.com/store/apps/details?id=org.aprsdroid.app&hl=en|https://play.google.com/store/apps/details?id=org.aprsdroid.app&hl=en}}
Software TNC:
MixW - APRS Decoder: [[http://polysat.calpoly.edu/earthstation/software/mixw/index.php|http://polysat.calpoly.edu/earthstation/software/mixw/index.php}} <– If it doesn't load, try Google Cache:[[http://webcache.googleusercontent.com/search?q=cache:QeQpeGckl2YJ:polysat.calpoly.edu/earthstation/software/mixw/index.php+&cd=1&hl=en&ct=clnk&gl=us&client=firefox-a|http://webcache.googleusercontent.com/search?q=cache:QeQpeGckl2YJ:polysat.calpoly.edu/earthstation/software/mixw/index.php+&cd=1&hl=en&ct=clnk&gl=us&client=firefox-a}}
Install Instructions: [[http://www.twarc.org/departments/digital-modes/agwpe---free-version/agwpe-freeware|http://www.twarc.org/departments/digital-modes/agwpe---free-version/agwpe-freeware}}
APRS ISCE - APRS Decoder: [[http://aprsisce.wikidot.com/|http://aprsisce.wikidot.com/}}
QTMM - APRS Decoder: [[http://sourceforge.net/projects/qtmm/|http://sourceforge.net/projects/qtmm/}}
Physical TNC: Radio audio outputs can also be connected to a physical TNC: [[http://www.mfjenterprises.com/pdffiles/MFJ-1270X.pdf|http://www.mfjenterprises.com/pdffiles/MFJ-1270X.pdf}}
==== Bravo Tracking Team ====
Team will have cellphones. And strippers, lots of strippers.
==== Charlie Tracking Team ====
Team will have directional antennas with appropriate gear to triangulate and calculate the position of the craft. Charlie beacon will be [[http://www.bigredbee.com/BeeLine.htm|Big Red Bee}} on 433.920Mhz, FM with tone and tone-based CW callsign ID.
Equipment for Charlie team includes:
* Basic team equipment above
* 70cm tracking antenna such as [[http://www.nr6ca.org/70cmyagi.html|Simple 70cm Yagi}}
* HAM Radio or scanner capable of receiving 70cm. Should also have a bar-graph or meter for signal strength
* Magnetic compass with adjustable declination
* Hand-held GPS
* Optional 2m tracking antenna for RDF on the 2m beacon
* Laptop running Maptech Pro (team leader)
==== APRS decoding with an SDR or Ham Radio/Audio Output ====
—-
=== Step 1: Obtain the appropriate hardware ===
In terms of hardware, there are two ways to receive APRS data:
- Use a [[https://dx.com/p/usb-dvb-t-tv-dongle-with-remote-8309|cheap DVB-T dongle}} as your receiver. Be sure to get one with the RTL283x chipset; you'll have to use Google to find out which ones do or do not have this. We've had good luck with ones using the RTL2838UHIDIR.
- Use a real Ham Radio, buy or create an audio cable that connects the speaker output of the radio to the computer audio input, have the software decode the radio's audio
—-
=== Step 2: Obtain the appropriate software ===
== Windows ==
Using SDR#:
* Follow directions at the below link to get SDR# set up:\ [[http://rtlsdr.org/softwarewindows|rtlsdr.org/softwarewindows}}
* Radio WFM
* Filter Bandwidth 14000
* VFO Approx 144 MHz
* Install MixW\ [[http://mixw.net/index.php?j=downloads|mixw.net/index.php}}
In MixW:
* Set Mode -> Packet
* Set Mode -> Mode Settings -> Modem -> VHF 1200 baud (Standard)
* Go to Configure -> Sound Device Settings
* Select your Stereo Mix for Input
* Speakers for output (to monitor)
If the above doesn't work you may have a shitty sound card like CHRIS. Download (TPB) and install Virtual Audio Cable. Install the device and set SDR# to send out to it. Set MixW to read from it.
== OS X ==
APRS packets have successfully been decoded using the [[http://dekar.wc3edit.net/2012/09/30/osx-port-of-the-awesome-gqrx-sdr-software/|gqrx SDR}} and one of the cheapo DVB-T dongles with the RTL2838UHIDIR chipset. This was under OS X 10.8.2 (two days later, 10.8.3) with gqrx installed from gqrx_7.dmg and the laughably-terrible antenna supplied with the DVB-T dongle.
Some notes about gqrx:
* The dongle worked out-of-the-box with no special configuration. If you don't hear anything, turn up the gain under 'receiver options'
* Expect +/- 20Khz variation from intended receive frequency with the dongle
* Filter was set to User @ 50Khz, mode: narrow FM. Hand-trimming the filter width was necessary
* Start the AFSK1200 decoder before starting the DSP; starting it after may audibly slur / corrupt the audio, meaning you can't decode APRS packets
* Squelch has no fine adjustment, so expect to have to alter gain (also no fine adjustment) to compensate
* Turning on audio recording will, by default, annoyingly save the .wav files generated to whatever directory you installed gqrx to. If that's /Applications, look there
== Cross-platform (XASTIR) ==
If you feel like stepping into the wonderful world of software that nobody has really tested yet, check out [[http://www.xastir.org/wiki/Main_Page|XASTIR}}. We're not saying it's not good software, just that none of us are actually using it so can't comment on its usefulness. However, it's supposed to be really awesome for APRS and apparently runs on every platform under the sun. Yay!
= A note about XASTIR on OS X =
Because OS X does things in weird ways, it's recommended to get XASTIR in pre-built form from [[http://www.nh6z.net/Amatuer_Radio_Station_NH6Z/Other_Peoples_Software.html|here}}. Read the instructions before trying to install it; you'll save yourself a lot of heartache. It will also require the current version of [[http://xquartz.macosforge.org/landing/|XQuartz}} in order to work. Note that this is presently untested though it is confirmed as at least installable and executable on OS X 10.8.3. The map data seems to be taking forfreakingever to download and install; YMMV.
XASTIR is available in [[https://www.macports.org/|Macports}}, but it's a slightly older version and doesn't build properly - at least, that's the case under XCode 4.6.1. Just get the binaries.
—-
=== Step 3: Decode the captured packets ===
Offline Method (RECOMMENDED):
* APRS Decoder for Windows: \ \ [[http://habexproject.org/mice/habex_2_aprs_win.zip|HABEX_2_APRS Windows}}
* APRS Decoder for Mac: \ [[http://habexproject.org/mice/habex_2_aprs_mac.zip|HABEX_2_APRS Mac}}
* APRS Decoder for Linux: \ [[http://habexproject.org/mice/habex_2_aprs_linux.zip|HABEX_2_APRS Linux}}
Online Method (Use only if you have an internet connection):
* There is a tool for online APRS packet decoding at [[http://mice.habexproject.org|mice.habexproject.org}}. Follow the instructions there (if you can copy & paste, this should not be difficult) and you'll be able to see the positioning data as both human-readable text and a pointer on a map.
—-
==== Landing Zones ====
—-
Anything that is not an Orange or Red Zone is an OK landing site:
DOWNLOAD THE KML: habex_no_land_zones.7z
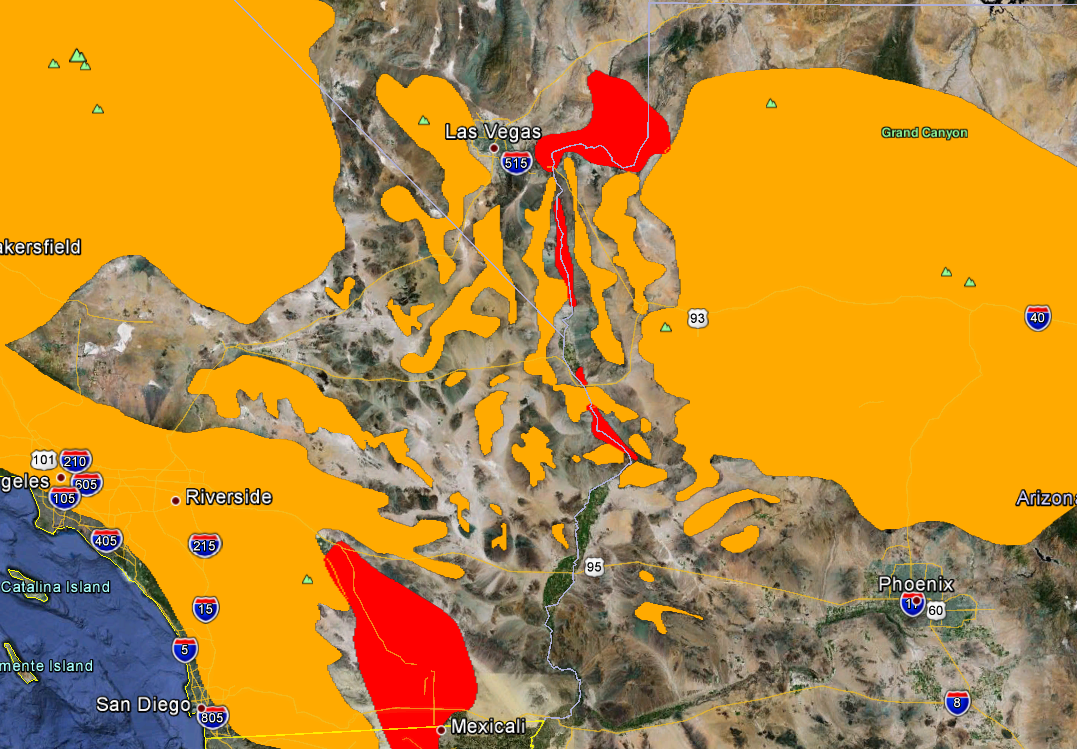 ===== Additional Links =====
[[http://batteryuniversity.com/learn/article/how_to_prolong_lithium_based_batteries|http://batteryuniversity.com/learn/article/how_to_prolong_lithium_based_batteries}} [[https://github.com/cuspaceflight|https://github.com/cuspaceflight}} [[http://showcase.netins.net/web/wallio/FOOTPRINT.html|http://showcase.netins.net/web/wallio/FOOTPRINT.html}} SUPER USEFUL LINKS:** [[http://ukhas.org.uk/frontpage:guides|http://ukhas.org.uk/frontpage:guides}} [[http://ukhas.org.uk/|http://ukhas.org.uk/}}
===== Additional Links =====
[[http://batteryuniversity.com/learn/article/how_to_prolong_lithium_based_batteries|http://batteryuniversity.com/learn/article/how_to_prolong_lithium_based_batteries}} [[https://github.com/cuspaceflight|https://github.com/cuspaceflight}} [[http://showcase.netins.net/web/wallio/FOOTPRINT.html|http://showcase.netins.net/web/wallio/FOOTPRINT.html}} SUPER USEFUL LINKS:** [[http://ukhas.org.uk/frontpage:guides|http://ukhas.org.uk/frontpage:guides}} [[http://ukhas.org.uk/|http://ukhas.org.uk/}}


Point of Failure
Radio, Electronics, and Payload
- RF reflection to power transistor (degradation)
- Power Regulator failure
- Antenna coming apart
- GPS/Power Connector coming loose
- GPS/Power Connector losing contact due to temperature change causing pins to shink
- RF Transistor Overheating
- Losing GPS lock
- GPS unable to get altitude above 60,000ft
- GPS unable to recapture GPS signal
- Condensation on electronics shorting or effecting circuitry (Use acrylic spray to seal circuits)
Parachute
- Tangling with balloon or parachute, thus preventing proper deployment
Balloon
- Cuts on the ground
- Rope tie slipping
- Need a filling station
- Enough helium
- Correct amount of helium for proper burst altitude

Unorganized Goals, Concerns, Ideas, etc.
Calculate Helium (or) Hydrogen requiredCalculate Rise/Fall rateCalculate target payload massCalculate mass variance (mass gains from humidity, mass lost from balloon, etc.)- Figure out balloon filling station and how to tie the balloon off.
- Parachute testing
- Nichrome/Receiver for cut off, testing
- Determine max acceleration on payload
- Design frame? Styrofoam?
- Possibly make an RTTY Trasmitter on 434?
- Antenna type for both payload and ground
Antenna orientation- Condensation effecting electronics
- Create an environmental chamber (thermal/vac)
- Pick electrical sealant based on testing (acrylic spray?)
- Choosing a primary and backup APRS/AX.25 decoder (software and hardware configuration)
- Create a setup and testing manual for aprs decoder
- Test the aprs decoder in multiple senarios (low volume, transmitter is far away, etc)
- Derating ALL electronic parts
- Calculate tensile strength of all ropes and tie points
- Create a list of possible launch locations and recovery locations
- Setup HABEX Predictor to run multiple instances of different launch/recovery senarios
- Have a list ready for the teams to disburse to
- BRING force gauge to measure neck lift
- Record all audio (com, ops, aprs, etc)
- All electronics REQUIRE peer review of at least 2 people
- Make sure everyone has enough fuel in their cars
- Find alternative software to MixW
- Create a software package for everyone to download
- Create frequency plan & everyone gets a paper with everyone's cell numbers
- HAVE A SAFETY PERSON
- Figure out how to get places that are unaccessable (mountain, private property, dangerous)
Launch & Recovery
Launch Day
<html> <object width=“400” height=“300”> <param name=“flashvars” value=“offsite=true&lang=en-us&page_show_url=%2Fphotos%2Farkorobotics%2Fsets%2F72157633147095080%2Fshow%2F&page_show_back_url=%2Fphotos%2Farkorobotics%2Fsets%2F72157633147095080%2F&set_id=72157633147095080&jump_to=”></param> <param name=“movie” value=“http://www.flickr.com/apps/slideshow/show.swf?v=124984”></param> <param name=“allowFullScreen” value=“true”></param><embed type=“application/x-shockwave-flash” src=“http://www.flickr.com/apps/slideshow/show.swf?v=124984” allowFullScreen=“true” flashvars=“offsite=true&lang=en-us&page_show_url=%2Fphotos%2Farkorobotics%2Fsets%2F72157633147095080%2Fshow%2F&page_show_back_url=%2Fphotos%2Farkorobotics%2Fsets%2F72157633147095080%2F&set_id=72157633147095080&jump_to=” width=“400” height=“300”></embed></object> <iframe width=“560” height=“315” src=“http://www.youtube.com/embed/hhUAiXzdfJk” frameborder=“0” allowfullscreen></iframe> </html>
Recovery Day
<html><object width=“400” height=“300”> <param name=“flashvars” value=“offsite=true&lang=en-us&page_show_url=%2Fphotos%2Farkorobotics%2Fsets%2F72157633237585697%2Fshow%2F&page_show_back_url=%2Fphotos%2Farkorobotics%2Fsets%2F72157633237585697%2F&set_id=72157633237585697&jump_to=”></param> <param name=“movie” value=“http://www.flickr.com/apps/slideshow/show.swf?v=124984”></param> <param name=“allowFullScreen” value=“true”></param><embed type=“application/x-shockwave-flash” src=“http://www.flickr.com/apps/slideshow/show.swf?v=124984” allowFullScreen=“true” flashvars=“offsite=true&lang=en-us&page_show_url=%2Fphotos%2Farkorobotics%2Fsets%2F72157633237585697%2Fshow%2F&page_show_back_url=%2Fphotos%2Farkorobotics%2Fsets%2F72157633237585697%2F&set_id=72157633237585697&jump_to=” width=“400” height=“300”></embed></object> <object width=“400” height=“300”> <param name=“flashvars” value=“offsite=true&lang=en-us&page_show_url=%2Fphotos%2Farkorobotics%2Fsets%2F72157633242316496%2Fshow%2F&page_show_back_url=%2Fphotos%2Farkorobotics%2Fsets%2F72157633242316496%2F&set_id=72157633242316496&jump_to=”></param> <param name=“movie” value=“http://www.flickr.com/apps/slideshow/show.swf?v=124984”></param> <param name=“allowFullScreen” value=“true”></param><embed type=“application/x-shockwave-flash” src=“http://www.flickr.com/apps/slideshow/show.swf?v=124984” allowFullScreen=“true” flashvars=“offsite=true&lang=en-us&page_show_url=%2Fphotos%2Farkorobotics%2Fsets%2F72157633242316496%2Fshow%2F&page_show_back_url=%2Fphotos%2Farkorobotics%2Fsets%2F72157633242316496%2F&set_id=72157633242316496&jump_to=” width=“400” height=“300”></embed></object> <iframe width=“560” height=“315” src=“http://www.youtube.com/embed/oJO5F0anwJs” frameborder=“0” allowfullscreen></iframe> <iframe width=“560” height=“315” src=“http://www.youtube.com/embed/AnkytLnb7O0” frameborder=“0” allowfullscreen></iframe> </html>
Flight Pictures
<html> <object width=“800” height=“600”> <param name=“flashvars” value=“offsite=true&lang=en-us&page_show_url=%2Fphotos%2Farkorobotics%2Fsets%2F72157633237341531%2Fshow%2F&page_show_back_url=%2Fphotos%2Farkorobotics%2Fsets%2F72157633237341531%2F&set_id=72157633237341531&jump_to=”></param> <param name=“movie” value=“http://www.flickr.com/apps/slideshow/show.swf?v=124984”></param> <param name=“allowFullScreen” value=“true”></param><embed type=“application/x-shockwave-flash” src=“http://www.flickr.com/apps/slideshow/show.swf?v=124984” allowFullScreen=“true” flashvars=“offsite=true&lang=en-us&page_show_url=%2Fphotos%2Farkorobotics%2Fsets%2F72157633237341531%2Fshow%2F&page_show_back_url=%2Fphotos%2Farkorobotics%2Fsets%2F72157633237341531%2F&set_id=72157633237341531&jump_to=” width=“400” height=“300”></embed></object> <iframe width=“840” height=“630” src=“http://www.youtube.com/embed/SWYrTHp9Er0” frameborder=“0” allowfullscreen></iframe> </html>
Layerone 2013 Talk - Near Space Exploration - Arko
<html> <iframe width=“560” height=“315” src=“http://www.youtube.com/embed/4-v-B03a1Jk” frameborder=“0” allowfullscreen></iframe> </html>
Flight Data
- Mostly raw dump [[http://wiki.032.la/nsl/File:HAB.TXT http://wiki.032.la/nsl/File:HAB.TXT}}
- Cleaned up data dump [[http://www.fileswap.com/dl/bdm8O5fOq9/ http://www.fileswap.com/dl/bdm8O5fOq9/}}
- Huge Excel doc with formatted timestamps [[http://www.fileswap.com/share/index.php?id=G5608Bmz8Z http://www.fileswap.com/share/index.php?id=G5608Bmz8Z}}